
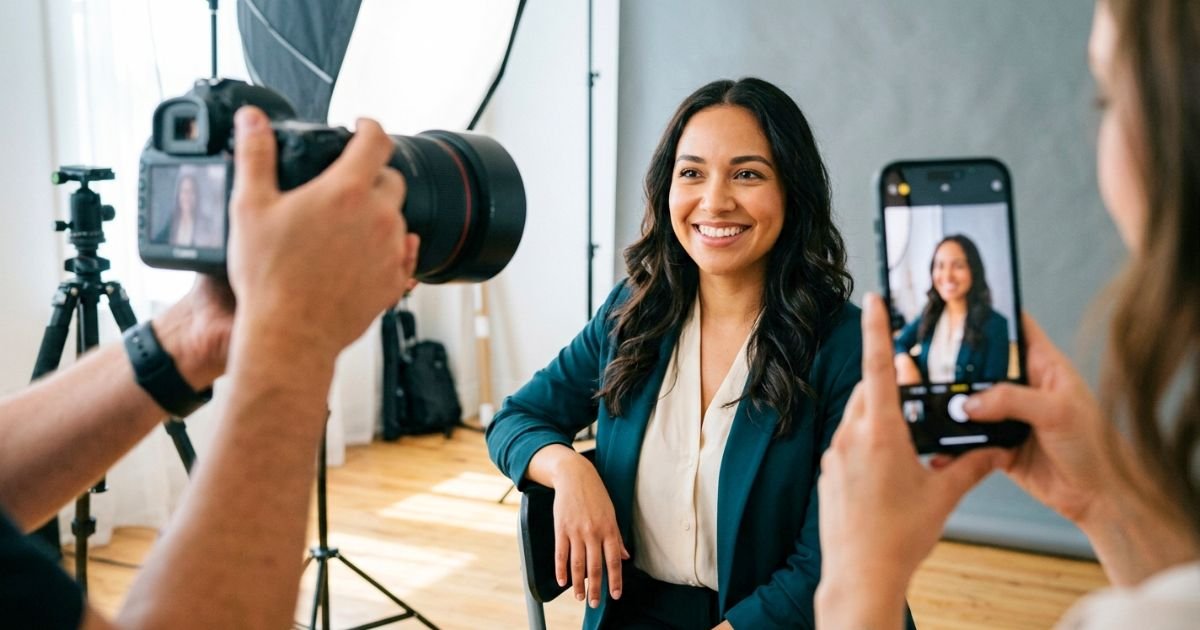
A professional headshot can open doors. Whether you’re updating your LinkedIn profile, launching a personal brand, applying for a new job, or building your business, a high-quality headshot helps you make a strong first impression. While hiring a professional photographer is still the gold standard, today’s smartphones are capable of producing impressive results when used correctly.
Modern phones feature advanced cameras, portrait modes, AI-powered image processing, and high-resolution sensors that make professional-looking portraits more accessible than ever. The key isn’t just owning the latest smartphone—it’s knowing how to use it effectively.

In this guide, you’ll learn how to take a professional headshot with your phone, including the best camera settings, lighting techniques, backgrounds, posing tips, editing recommendations, and common mistakes to avoid. By following these proven techniques, you can create a polished, high-quality headshot that reflects your confidence and professionalism.
Can You Really Take a Professional Headshot with a Phone?
The short answer is yes—but with realistic expectations.
Today’s smartphones, such as the latest iPhone, Google Pixel, and Samsung Galaxy models, can capture excellent portraits with sharp details and beautiful background blur. However, the quality of your final image depends much more on lighting, composition, and preparation than the device itself.
For many purposes, a well-planned smartphone headshot works perfectly for:
- LinkedIn profiles
- Company directories
- Business websites
- Personal branding
- Speaking engagements
- Email signatures
- Social media profiles
If you need images for large advertising campaigns, magazine publications, or commercial print projects, a professional photography session is still the better option. But for most online professional profiles, your phone can deliver excellent results.
Why Your Headshot Matters More Than Ever
Your headshot is often the first thing people notice before reading your resume, bio, or business profile. Whether someone finds you through LinkedIn, your company’s website, or a networking platform, your photo helps shape their first impression in just a few seconds.
A professional-looking headshot communicates qualities such as:
- Confidence
- Trustworthiness
- Approachability
- Professionalism
- Credibility
A poorly lit, blurry, or casual selfie can unintentionally send the opposite message, even if you’re highly qualified.
What You’ll Need Before You Start
You don’t need an expensive photography studio, but a few basic tools can dramatically improve your results.
Essential Equipment:
Equipment | Why It Helps |
Smartphone with Portrait Mode | Creates natural background blur and sharp facial focus |
| Tripod | Keeps your phone stable and improves composition |
Phone Tripod Mount | Holds your phone securely during the shoot |
| Bluetooth Remote or Camera Timer | Prevents camera shake when taking photos |
Natural Window Light or Soft LED Light | Produces flattering, even lighting |
| Microfiber Cloth | Cleans fingerprints from your camera lens |
If you don’t own a tripod, you can stabilize your phone using a shelf, stack of books, or another sturdy surface.
Clean Your Camera Lens First
It sounds simple, but this is one of the most overlooked steps. Your phone spends most of its time in your pocket, purse, or bag, collecting fingerprints, dust, and smudges that reduce image quality.
Before taking any photos:
- Use a clean microfiber cloth.
- Gently wipe both front and rear camera lenses.
- Avoid using tissues or rough fabrics that could scratch the lens.
A clean lens instantly improves sharpness and contrast.
Choose the Best Camera on Your Phone
Whenever possible, use the rear camera instead of the selfie camera.
Rear Camera Benefits
- Higher image resolution
- Better sharpness
- Improved color accuracy
- More natural depth of field
- Better low-light performance
While front-facing cameras continue to improve, the rear camera almost always produces better-quality professional portraits.

Best Camera Settings for a Phone Headshot
Every smartphone is slightly different, but these general recommendations work well for most devices for camera settings.
Setting | Recommendation |
| Camera Mode | Portrait Mode |
HDR | Enabled |
Flash | Off |
| Resolution | Highest Available |
Filters | Off |
| Zoom | 1x or 2x Optical (if available) |
Beauty Mode | Disabled |
| Live Photo | Optional |
Avoid heavy beauty filters. They often create an artificial appearance that doesn’t look professional.
Find the Best Natural Light
Lighting has a greater impact on your headshot than the camera itself.
Professional photographers often say:
- Great light beats expensive gear.
- That principle applies equally to smartphone photography.
Use Window Light
A large window provides soft, flattering light that’s perfect for portraits. Stand about three to six feet away from the window. Face the light rather than standing with the window behind you.
This setup helps:
- Reduce harsh shadows
- Brighten your eyes
- Produce natural-looking skin tones
- Create even facial lighting
Avoid Direct Midday Sunlight
Bright overhead sunlight creates:
- Squinting
- Harsh facial shadows
- Uneven skin tones
- Overexposed highlights
Instead, photograph during:
- Morning light
- Late afternoon
- Overcast days
- Soft indoor window light
Should You Use Ring Lights?
Ring lights can work well if natural light isn’t available. However, use them carefully.
A ring light should:
- Produce soft, even illumination
- Sit directly behind the phone
- Be positioned slightly above eye level
Avoid extremely bright settings that flatten facial features.
Choose a Clean, Professional Background
Your background should support your portrait—not distract from it. Simple backgrounds help viewers focus on your face.
Great Background Ideas
- Plain white wall
- Light gray wall
- Neutral-colored office
- Outdoor greenery
- Brick wall
- Modern workspace
- Clean home office
- Library shelves
Keep the background uncluttered and visually balanced.
Backgrounds to Avoid
Avoid photographing in front of:
- Laundry
- Busy kitchens
- Cars
- Television screens
- Messy bedrooms
- Bright signs
- Crowded spaces
Anything that competes for attention reduces the professional appearance of your headshot.
Wear the Right Outfit
- Clothing plays an important role in creating a polished image.
- Choose attire that reflects your profession while keeping the focus on your face.
Best Clothing Choices
Solid colors photograph best.
Consider:
- Navy blue
- Charcoal gray
- White
- Black
- Forest green
- Burgundy
- Soft blue
These colors complement most skin tones and create a timeless appearance.
Avoid Distracting Clothing
Skip:
- Large logos
- Busy patterns
- Neon colors
- Reflective fabrics
- Wrinkled clothing
- Trendy graphics
Simple, classic clothing always photographs better.
Dress for Your Industry:
Profession | Recommended Outfit |
| Corporate Professional | Suit or blazer with dress shirt or blouse |
Entrepreneur | Smart business casual |
| Real Estate Agent | Professional business attire |
Consultant | Neutral blazer with solid-colored shirt |
| Creative Professional | Modern business casual with subtle personality |
Freelancer | Polished casual attire appropriate for your niche |
When in doubt, dress slightly more professionally than you normally would for work.
Grooming Tips Before Taking Your Phone Headshot
Preparation matters just as much for smartphone photography as it does for a professional studio session.
Before you begin:
- Style your hair as you normally would.
- Trim facial hair if needed.
- Moisturize your skin.
- Reduce facial shine with light powder if necessary.
- Remove lint from clothing.
- Clean your glasses.
- Get enough sleep the night before.
These small details contribute to a more polished final image.
Prepare Yourself Before the Shoot
A relaxed expression is one of the most valuable elements of a successful headshot.
Before taking photos:
- Take a few deep breaths.
- Stretch your shoulders.
- Relax your jaw.
- Smile naturally.
- Think about someone or something that genuinely makes you happy.
Your goal isn’t to look perfect—it’s to look approachable, confident, and authentic.
Professional Photographer’s Tip: One of the biggest differences between an average phone headshot and a professional-looking portrait is patience. Don’t expect the perfect image in your first few shots. Professional photographers often capture dozens—or even hundreds—of frames during a session to find the strongest expressions. Take your time, make small adjustments between shots, and review your images carefully. A little patience can transform a simple smartphone photo into a polished headshot you’ll be proud to use.
Master Your Pose for a More Professional Look
Even with perfect lighting and the latest smartphone, your pose can make or break your headshot. The goal is to look confident, approachable, and natural—not stiff or overly posed. The good news is that you don’t need modeling experience. A few simple adjustments can dramatically improve your photos.
Stand with Good Posture
Your posture communicates confidence before anyone even notices your facial expression.
Keep these tips in mind:
- Stand tall with your shoulders relaxed.
- Keep your back straight without appearing rigid.
- Lift your chest slightly.
- Lengthen your neck naturally.
- Avoid slouching or leaning too far forward.
Good posture helps create a polished, professional appearance while making you look more confident.
Find Your Best Angle
Most people look better when they turn their bodies slightly rather than facing the camera straight on.
A simple technique is to:
- Turn your body about 30–45 degrees away from the camera.
- Keep your face turned back toward the lens.
- Shift your weight slightly onto your back foot.
This creates a more flattering shape and adds depth to your portrait.
Position Your Chin Correctly
One of the most common headshot mistakes is pulling your chin backward.
Instead:
- Push your forehead slightly toward the camera.
- Lower your chin just a little.
- Keep your neck long and relaxed.
Although it may feel unusual, this subtle adjustment creates a more defined jawline and reduces the appearance of a double chin.
Relax Your Hands
If your hands appear in the frame, avoid clenching your fists or letting your arms hang stiffly.
Instead, try:
- Crossing your arms naturally.
- Resting one hand lightly on your lap.
- Holding a jacket over one shoulder.
- Placing one hand in a pocket (for business casual portraits).
Natural hand placement helps your entire body look more relaxed.
Create a Natural Facial Expression
People connect with authentic expressions. Rather than forcing a smile, think about something that genuinely makes you happy. A natural smile usually reaches your eyes, making your portrait appear warmer and more approachable.
Smile Naturally
Avoid saying “cheese.”
Instead:
- Think about a favorite memory.
- Imagine greeting a colleague.
- Picture talking with a good friend.
- Take a slow breath before each photo.
The best expressions usually happen between poses rather than during a forced smile.
Make Eye Contact with the Camera
Imagine the camera lens is the person viewing your LinkedIn profile or company website. Look directly into the lens—not at the phone screen.
Strong eye contact creates:
- Confidence
- Trust
- Connection
- Professionalism
If you’re using a timer, choose a focal point near the lens to help maintain natural eye contact.
Frame Your Headshot Like a Professional
Composition plays a huge role in making your headshot look polished.
Leave Enough Space Around Your Head
Your face should remain the clear focal point.
A common composition guideline is:
- Leave a small amount of space above your head.
- Crop around the upper chest or shoulders.
- Keep your eyes roughly one-third of the way from the top of the frame.
This framing works well for LinkedIn, company websites, and business profiles.
Hold Your Phone at Eye Level
Avoid shooting from:
- Below your chin
- Above your head
- Extreme side angles
Instead, position the camera at approximately eye level. This creates the most natural perspective and minimizes facial distortion.
Use Portrait Mode the Right Way
Portrait Mode can produce beautiful background blur, but only when used correctly.
For the best results:
- Stand several feet away from the background.
- Keep your face well-lit.
- Avoid clutter behind you.
- Stay within the recommended distance shown by your camera.
Portrait Mode works best when there’s clear separation between you and the background.

Should You Use a Tripod or Ask Someone to Help?
Both options can work, depending on your situation.
Method | Advantages | Best For |
| Tripod + Timer | Consistent framing and full control | Solo headshots |
Bluetooth Remote | Easy to take multiple photos quickly | Individual sessions |
| Friend or Family Member | More natural expressions and slight angle adjustments | Lifestyle or branding portraits |
If someone is helping you, ask them to capture several images from slightly different angles rather than just one or two photos.
Use the Timer Instead of Holding Your Phone
Avoid taking professional headshots as selfies.
Holding your phone:
- Changes your posture.
- Creates awkward arm positions.
- Produces distorted angles.
- Limits composition.
Instead:
- Place your phone on a tripod.
- Use a 3- or 10-second timer.
- Step into position.
- Relax before each photo.
This simple change immediately makes your headshots look more professional.
Take More Photos Than You Think You Need
Professional photographers rarely capture the perfect image on the first attempt. Instead of taking five photos, aim for 50–100 images.
Between shots, make small adjustments:
- Turn your shoulders slightly.
- Change your smile.
- Tilt your head a little.
- Look away briefly before looking back.
- Shift your weight.
These subtle changes create variety and increase your chances of finding the perfect headshot.
Review Your Photos Carefully
Don’t rush to choose your favorite image.
Zoom in and check for:
- Sharp eyes
- Natural skin tones
- Proper focus
- Relaxed expression
- Wrinkled clothing
- Stray hairs
- Distracting background objects
A small issue that’s easy to fix during the session is much harder to correct later.
Edit Your Phone Headshot Naturally
Editing should enhance your photo—not completely change your appearance.
Focus on subtle improvements.
Recommended Adjustments:
- Brightness
- Contrast
- White balance
- Exposure
- Highlights
- Shadows
- Sharpness
Avoid excessive filters or dramatic edits.
Your final headshot should still look like you.
Recommended Editing Apps:
App | Best For |
| Adobe Lightroom Mobile | Professional color correction |
Snapseed | Free photo editing |
| Google Photos | Quick enhancements |
Apple Photos | Basic editing on iPhone |
| Samsung Gallery | Built-in Android adjustments |
Use editing tools conservatively to maintain a natural and professional appearance.
Phone Headshot Do vs. Don’t Guide
✅ Do | ❌ Don’t |
| Use the rear camera | Use the front selfie camera if possible |
Clean your camera lens | Ignore fingerprints on the lens |
| Photograph near a window | Use harsh overhead lighting |
Wear solid colors | Wear busy patterns or large logos |
| Use Portrait Mode | Overuse beauty filters |
Hold the camera at eye level | Shoot from below your face |
| Use a tripod and timer | Hold your phone for a selfie |
Take multiple photos | Expect one shot to be perfect |
| Edit naturally | Over-edit your skin or facial features |
Smile genuinely | Force an unnatural smile |
Phone Headshot Preparation Checklist
Before taking your photos, make sure you’ve completed the following:
- Clean your smartphone camera lens.
- Charge your phone battery.
- Wear clean, wrinkle-free clothing.
- Choose a simple, uncluttered background.
- Find soft natural light or set up a soft LED light.
- Place your phone on a tripod or stable surface.
- Turn on Portrait Mode.
- Disable beauty filters.
- Use the camera timer or a Bluetooth remote.
- Check your hair, makeup, and clothing one last time.
- Relax and take multiple photos.
Professional Photographer Tips for Better Phone Headshots
Tip #1: Shoot During Golden Hour
- If you’re taking your headshot outdoors, photograph during the hour after sunrise or the hour before sunset.
- The softer light creates flattering skin tones and minimizes harsh shadows.
Tip #2: Keep the Background Far Away
- The farther you stand from the background, the stronger the natural background blur will appear—even with a smartphone camera.
- Aim for at least 6–10 feet of separation whenever possible.
Tip #3: Use Grid Lines
Enable your phone’s camera grid.
This helps you:
- Keep the horizon straight.
- Position your eyes correctly.
- Improve overall composition.
Tip #4: Turn Off Digital Zoom
- Digital zoom often reduces image quality.
- Instead, move physically closer to your subject or use your phone’s optical zoom lens if available.
Tip #5: Take Breaks
- If you begin to feel frustrated, pause for a few minutes.
- Fresh expressions almost always produce better headshots than forcing yourself through dozens of rushed photos.
Common Mistakes to Avoid
Even with a great smartphone, these mistakes can reduce the quality of your headshot.
- Poor Lighting: Harsh overhead lights or dim rooms create unflattering shadows and dull skin tones.
- Cluttered Backgrounds: Busy backgrounds distract attention from your face.
- Heavy Filters: Overly edited photos often appear artificial and unprofessional.
- Low Camera Angle: Holding the phone below your face creates an unflattering perspective.
- Looking at the Screen Instead of the Lens: Always focus your eyes on the camera lens to create better engagement.
- Wearing Distracting Clothing: Bright logos, loud patterns, and reflective fabrics pull attention away from your expression.
A Step-by-Step Workflow for Taking a Professional Phone Headshot
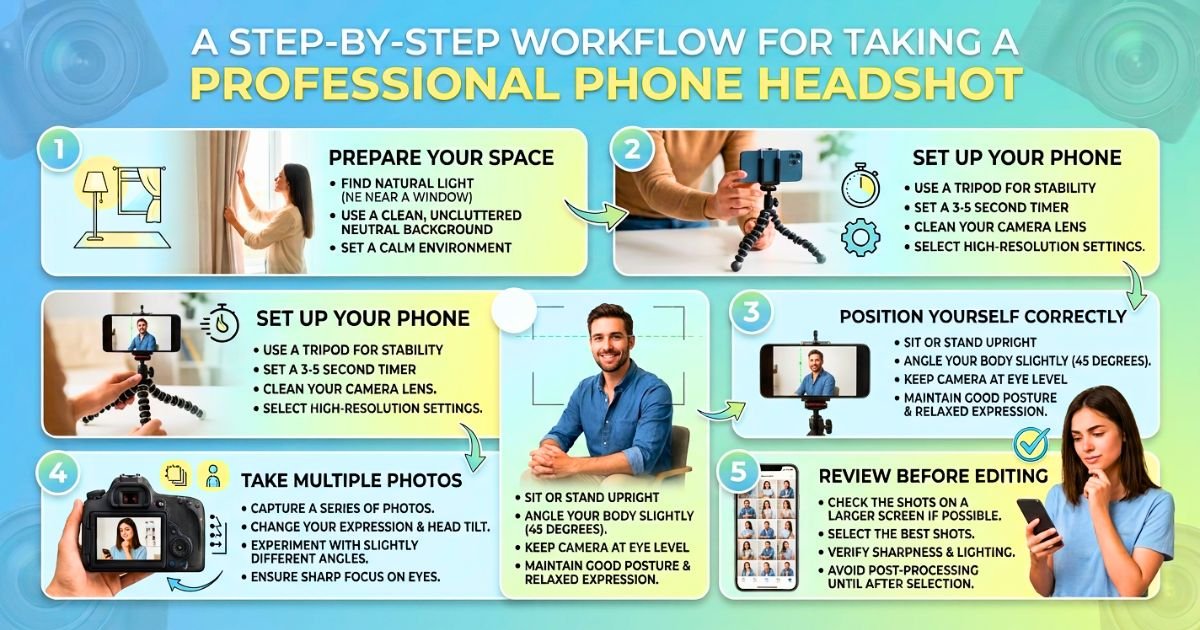
By now, you understand the importance of lighting, composition, clothing, and posing. Here’s a simple workflow you can follow every time you need to update your professional headshot.
Step 1: Prepare Your Space
Start by choosing a clean, distraction-free location with plenty of natural light. If you’re indoors, position yourself near a large window with indirect sunlight.
Before you begin:
- Remove unnecessary objects from the background.
- Wipe your phone’s camera lens.
- Set up your tripod or stable surface.
- Check your clothing for wrinkles or lint.
Taking a few minutes to prepare your space can significantly improve the quality of your final images.
Step 2: Set Up Your Phone
Configure your camera before stepping in front of it.
Use these recommended settings:
- Portrait Mode enabled
- Flash turned off
- Highest available resolution
- HDR enabled (if available)
- Beauty filters disabled
- Timer set to 3 or 10 seconds
These settings help create a clean, natural-looking portrait.
Step 3: Position Yourself Correctly
Stand about 3–6 feet away from the camera.
For the most flattering composition:
- Keep your shoulders relaxed.
- Turn your body slightly.
- Face the camera with your eyes.
- Leave a small amount of space above your head.
- Frame yourself from the chest or shoulders upward.
This composition works well for LinkedIn, business websites, company profiles, and personal branding.
Step 4: Take Multiple Photos
Don’t settle for the first image.
Professional photographers often capture dozens—or even hundreds—of photos to find the perfect expression.
Experiment with:
- Different smiles
- Slight head tilts
- Shoulder angles
- Eye expressions
- Small posture adjustments
Tiny changes often make a surprisingly big difference.
Step 5: Review Before Editing
Look carefully at each image before making edits.
Ask yourself:
- Are my eyes sharp?
- Does my smile look natural?
- Is the lighting even?
- Is the background clean?
- Does my clothing look neat?
- Would I use this on LinkedIn or my company’s website?
Choose the image that feels authentic rather than simply the most dramatic.
Phone Headshot vs. Professional Studio Headshot
Smartphones have come a long way, but there are still situations where hiring a professional photographer is the better choice.
Feature | Smartphone Headshot | Professional Studio Headshot |
| Cost | Low | Higher investment |
Convenience | Excellent | Requires scheduling |
| Image Quality | Very Good | Exceptional |
Lighting Control | Limited | Complete professional control |
| Background Options | Limited | Wide variety of studio and environmental backgrounds |
Posing Guidance | Self-directed | Expert coaching throughout the session |
| Retouching | Basic editing | Professional retouching included |
Best For | LinkedIn, resumes, social profiles, personal branding | Corporate websites, executive portraits, marketing materials, publications |
Professional Tip: A smartphone headshot is an excellent temporary or budget-friendly solution. However, if you’re building a business, applying for executive positions, or updating your company’s leadership profiles, investing in a professional headshot session is often worthwhile.
When Should You Hire a Professional Photographer?
While smartphone cameras can produce impressive results, there are times when professional photography provides clear advantages.
Consider booking a professional session if you:
- Need executive or leadership portraits.
- Are launching a new business or personal brand.
- Want team headshots with a consistent look.
- Need images for print advertising or magazines.
- Require environmental branding photography.
- Want expert guidance with posing and lighting.
Professional photographers bring experience, specialized equipment, and creative direction that are difficult to replicate with a phone alone.
How to Choose the Best Headshot
After taking dozens of photos, selecting the right one can feel overwhelming.
Use this simple checklist.
Choose the image that:
- Shows a genuine expression.
- Has sharp focus on your eyes.
- Features clean, even lighting.
- Looks natural and authentic.
- Reflects your current appearance.
- Matches your professional industry.
- Has a clean, distraction-free background.
If you’re deciding between two similar images, ask a trusted colleague or friend for feedback.
Should You Retouch Your Phone Headshot?
Yes—but keep it subtle.
Professional headshots should enhance your appearance without making you look like a different person.
Good retouching includes:
- Removing temporary blemishes.
- Reducing under-eye shadows.
- Correcting exposure.
- Adjusting white balance.
- Improving contrast.
- Removing distracting background objects if necessary.
Avoid changing permanent facial features or applying heavy beauty filters.
Before You Upload Your Headshot
Before updating your LinkedIn profile, company website, or personal portfolio, complete this final review.
Final Headshot Checklist
- Eyes are sharp and in focus.
- Lighting looks soft and natural.
- Background is clean and uncluttered.
- Clothing is wrinkle-free.
- Colors look natural.
- Image is high resolution.
- Crop is appropriate for the platform.
- The photo accurately represents your current appearance.
- Your expression feels confident and approachable.

Frequently Asked Questions: How to Take a Professional Headshot with Your Phone?
1. Can I take a professional headshot with any smartphone?
- Yes. Most modern smartphones can capture excellent headshots if you use good lighting, proper composition, and thoughtful editing.
2. Should I use the front or rear camera?
- The rear camera usually offers higher image quality, better sharpness, and more accurate colors than the front-facing camera.
3. What is the best lighting for a phone headshot?
- Soft natural light from a large window is one of the best options. It creates flattering skin tones and minimizes harsh shadows.
4. Should I use Portrait Mode?
- Yes. Portrait Mode helps separate you from the background by creating a subtle, professional-looking blur.
5. Can I use a selfie for LinkedIn?
- A traditional handheld selfie is not recommended. Using a tripod or asking someone to take the photo creates a much more professional result.
6. What should I wear?
- Choose solid-colored clothing that reflects your profession. Avoid busy patterns, large logos, and neon colors.
7. How many photos should I take?
- Aim for at least 50–100 images to give yourself plenty of options.
8. Is it okay to edit my headshot?
- Yes, but edits should be subtle. Enhance your image rather than dramatically changing your appearance.
9. What background works best?
- Simple, uncluttered backgrounds such as plain walls, offices, or outdoor greenery work well.
10. Should I smile?
- A natural smile often creates a warm, approachable impression. Your expression should match your personal brand and profession.
11. Can I wear glasses?
- Yes. Clean the lenses before your session and position yourself to minimize glare.
12. What resolution should I use?
- Always select the highest available resolution to ensure your image remains sharp across different platforms.
13. How often should I update my headshot?
- Update your headshot every 2–3 years, or sooner if your appearance or career changes significantly.
14. Can I use AI filters to improve my photo?
- Use AI tools sparingly. Over-processed images may look unnatural and reduce trust.
15. When should I book a professional headshot session instead?
- If you’re building a personal brand, applying for leadership roles, or representing a business publicly, a professional photography session offers the highest quality and consistency.
Conclusion
Taking a professional headshot with your phone is easier than ever, but creating an image that truly represents you still requires planning and attention to detail. The right combination of lighting, composition, clothing, posing, and subtle editing can transform an ordinary smartphone photo into a polished portrait that reflects your professionalism.
Remember that your headshot is often the first impression people have of you online. Whether it’s displayed on LinkedIn, your company website, or your personal portfolio, it should communicate confidence, authenticity, and approachability.
While a smartphone can produce outstanding results for many professional uses, there are times when working with an experienced photographer offers added value through expert lighting, posing, and retouching. If your career or business depends on making the strongest possible impression, investing in a professional headshot session can be one of the smartest decisions you make. Whether you choose your smartphone or a professional camera, preparation remains the key to creating a headshot you’ll be proud to share.

