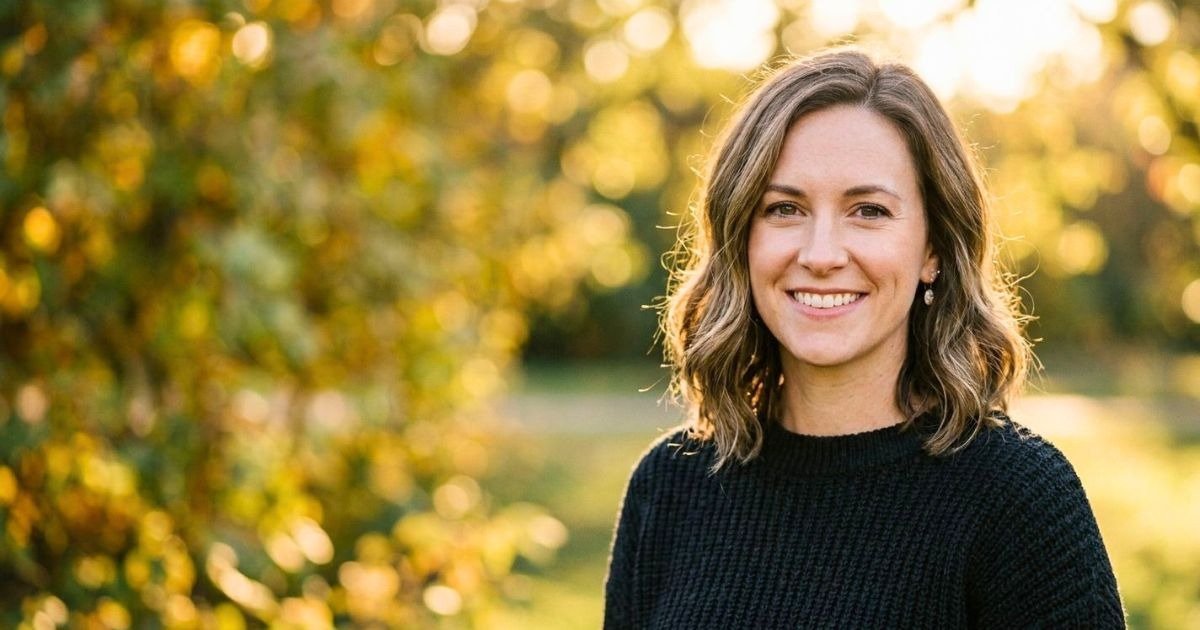
Getting a stunning portrait is about much more than owning an expensive camera or the latest lens. While high-end equipment certainly helps, the real secret lies in understanding how your camera settings work together to create a sharp, well-exposed, and flattering image. Whether you’re photographing professional headshots in a controlled studio, capturing family portraits outdoors, or shooting lifestyle sessions in natural light, mastering the right camera settings will dramatically improve your results.
Every portrait session presents different lighting conditions, subject movements, and creative goals. A softly blurred background might be perfect for an individual headshot, while a family portrait may require a deeper depth of field to keep everyone in focus. Knowing when and how to adjust your aperture, shutter speed, ISO, and white balance allows you to adapt confidently to any situation.
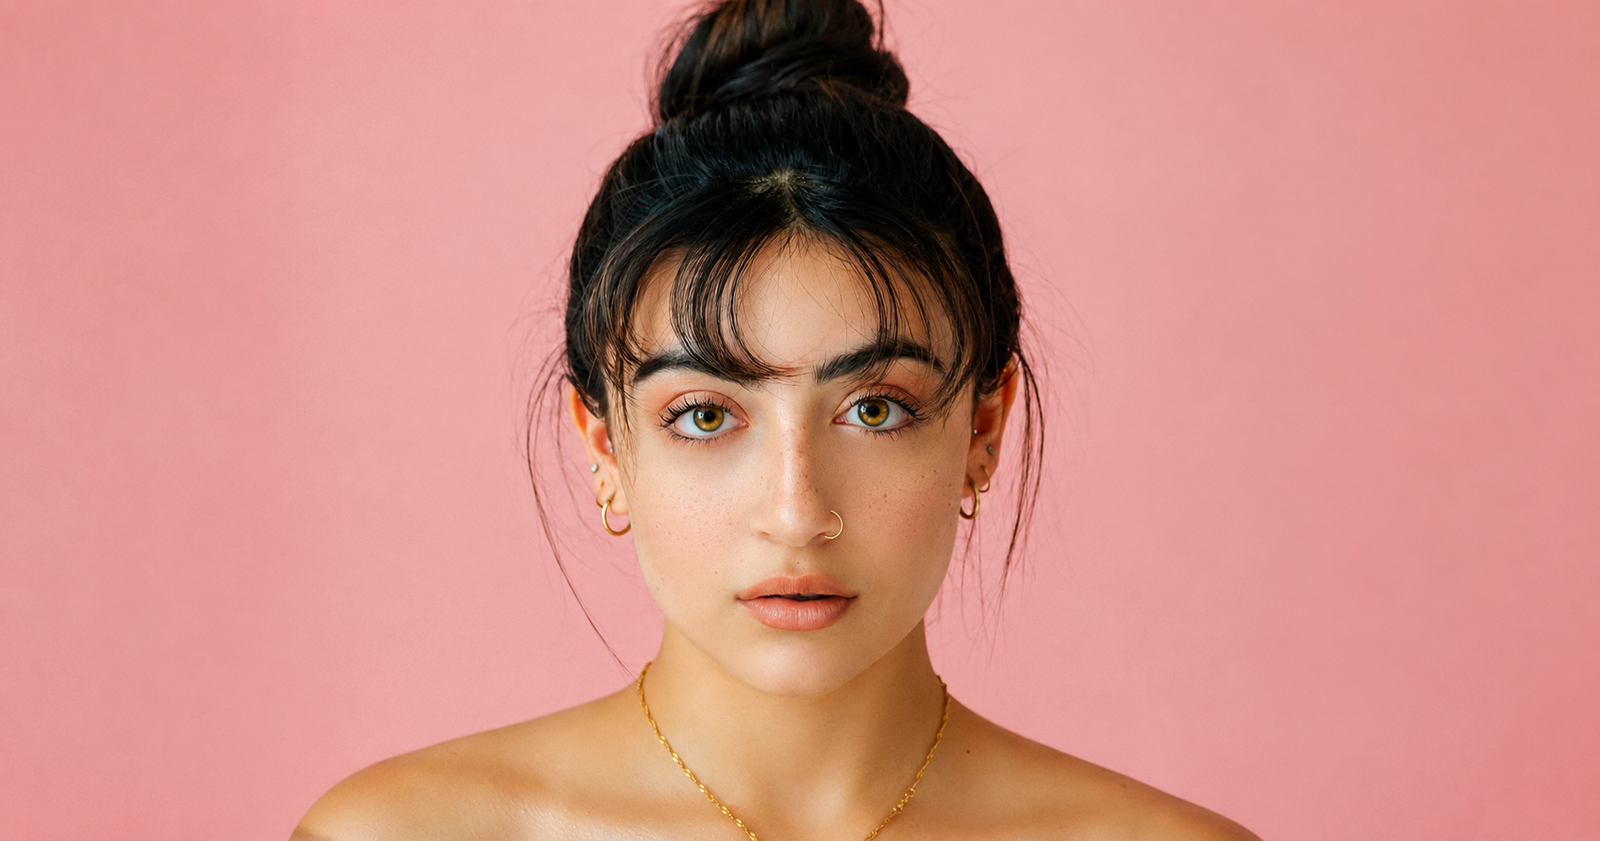
This comprehensive guide explains the best camera settings for portrait photography in simple, practical terms. You’ll learn why each setting matters, how professional photographers make their decisions, and which combinations work best for various portrait styles. Whether you’re a beginner learning manual mode or an experienced photographer looking to refine your workflow, these recommendations will help you capture consistently beautiful portraits with natural skin tones, crisp focus, and balanced exposure.
Why Camera Settings Matter More Than Gear?
One of the biggest misconceptions among beginner photographers is that buying a more expensive camera will instantly produce professional-looking portraits. In reality, even the most advanced camera cannot compensate for poor camera settings. Understanding how to control your camera manually will almost always have a greater impact on image quality than upgrading your equipment.
Professional photographers often create exceptional portraits using older camera bodies because they know how to work with available light, select appropriate exposure settings, and position their subjects effectively. Meanwhile, someone shooting in automatic mode may struggle to achieve the same results despite owning premium gear. Camera settings directly influence every important aspect of a portrait.
Including:
- Overall image brightness and exposure
- Sharpness of your subject
- Background blur (bokeh)
- Skin tone accuracy
- Image noise and detail
- Motion blur
- Color consistency
- Overall visual mood
Instead of relying on automatic modes, learning Manual (M) mode or Aperture Priority (A/Av) mode gives you much greater creative control. These shooting modes allow you to intentionally adjust your settings based on your subject, lighting conditions, and artistic vision.
Below is a simple comparison showing how camera knowledge compares to expensive equipment:
Factor | Beginner with an Expensive Camera | Photographer with Strong Camera Skills |
|---|---|---|
Exposure | Often inconsistent | Consistently accurate |
Background Blur | Depends on Auto Mode | Intentionally controlled |
Sharp Focus | Camera decides | The photographer chooses the focus point |
Skin Tones | Can vary greatly | Consistent and natural |
Low-Light Performance | Higher chance of noisy images | Optimized settings reduce noise |
Overall Portrait Quality | Unpredictable | Professional and repeatable |
Understanding camera settings also improves your confidence during portrait sessions. Instead of constantly checking every image and making random adjustments, you’ll know exactly which setting needs changing when lighting conditions shift.
For example:
- If your subject starts moving, increase your shutter speed.
- If your background appears too distracting, use a wider aperture.
- If your images become too dark, adjust ISO or exposure rather than relying on heavy editing later.
- If skin tones look too cool or too warm, fine-tune your white balance instead of fixing every image individually in post-processing.
Another advantage of mastering camera settings is consistency. Clients expect every image from a session to have similar color, brightness, and sharpness. Manual control helps you maintain that consistency even when shooting in changing environments.
“Your camera is just a tool. Mastering the settings is what separates snapshots from portraits.”
— Joe McNally, Portrait Photographer
Ultimately, investing time in learning exposure and camera controls provides a far greater return than continually upgrading your gear. Once these skills become second nature, you’ll spend less time troubleshooting technical issues and more time focusing on posing, composition, lighting, and building a connection with your subject—all of which contribute to truly memorable portraits.
The Core Settings for Portrait Photography
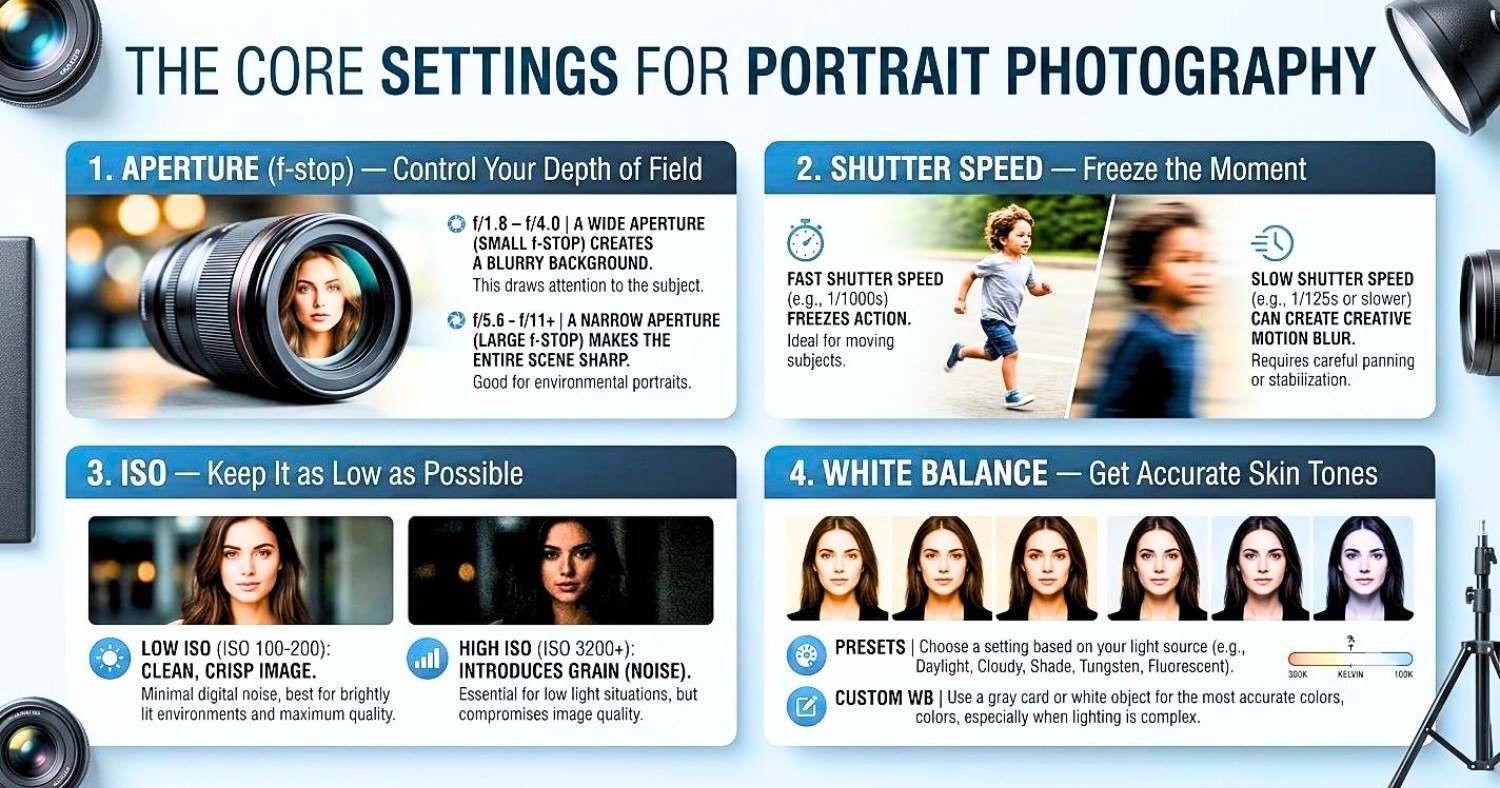
Every properly exposed portrait is built around four fundamental camera settings:
- Aperture
- Shutter Speed
- ISO
- White Balance
Together, these controls determine how much light reaches the camera sensor, how your subject appears in focus, and how accurately colors are reproduced. Think of these settings as a team rather than separate controls. Adjusting one often requires compensating with another to maintain proper exposure. This relationship is commonly known as the Exposure Triangle.
The table below provides a quick overview before we examine each setting in detail.
Camera Setting | Primary Purpose | Portrait Impact |
|---|---|---|
Aperture | Controls lens opening | Background blur and depth of field |
Shutter Speed | Controls exposure time | Prevents motion blur and camera shake |
ISO | Controls sensor sensitivity | Balances brightness and image noise |
White Balance | Controls color temperature | Produces natural-looking skin tones |
Although all four settings are important, their priority changes depending on your shooting scenario.
Portrait Situation | Highest Priority |
|---|---|
Professional Headshots | Aperture and Eye Focus |
Outdoor Portraits | Aperture and Shutter Speed |
Indoor Natural Light | ISO and Aperture |
Studio Photography | Aperture and White Balance |
Moving Subjects | Fast Shutter Speed |
Learning how these settings work together allows you to react quickly as lighting changes throughout a portrait session. Instead of guessing, you’ll know exactly which adjustment will solve an exposure problem while preserving the creative look you want.
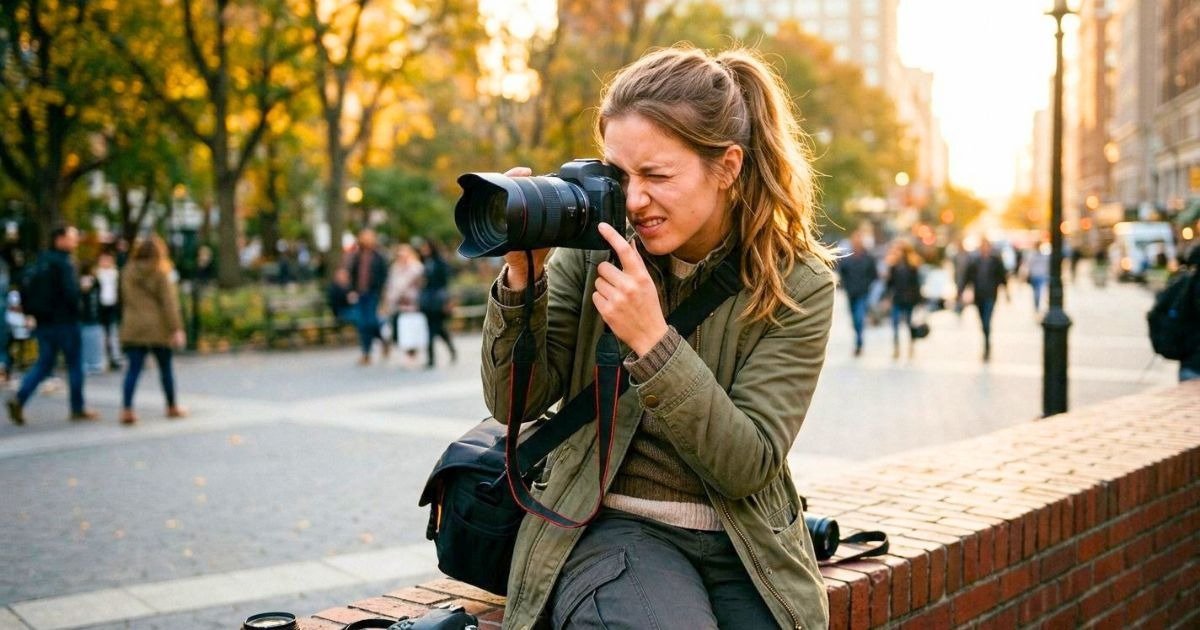
1. Aperture (f-stop) — Control Your Depth of Field
Among all the camera settings used in portrait photography, aperture has the greatest influence on the overall appearance of your images. It controls the size of the opening inside the lens, determining how much light enters the camera and how much of the scene remains in focus.
A wide aperture creates the signature portrait look that most photographers aim for—a tack-sharp subject against a beautifully blurred background. This effect helps separate your subject from distracting surroundings and naturally draws the viewer’s attention to the eyes and facial expression.
A narrow aperture, on the other hand, increases the depth of field so that more of the scene remains sharp. This is useful for group portraits, environmental portraits, or situations where background details contribute to the story.
Understanding Aperture Values
One concept that often confuses beginners is that smaller f-numbers actually represent larger lens openings.
For example:
- f/1.4 allows far more light into the camera than f/8.
- f/2 produces much stronger background blur than f/5.6.
Recommended Aperture Settings for Portraits:
Aperture | Best Use | Background Blur | Difficulty |
|---|---|---|---|
f/1.2–f/1.4 | Creative close-up portraits | Extremely strong | Advanced |
f/1.8 | Individual portraits | Very strong | Moderate |
f/2–f/2.8 | Professional headshots | Strong | Easy |
f/4 | Half-body and couple portraits | Moderate | Easy |
f/5.6 | Small groups | Mild | Easy |
f/8–f/11 | Large family portraits | Minimal | Easy |
Choosing the Right Aperture
Your ideal aperture depends on several factors:
- Number of people in the frame
- Distance between subject and background
- Lens focal length
- Available light
- Desired artistic style
For example, an 85mm lens at f/2 can produce an incredibly creamy background while keeping the eyes razor sharp. However, if the subject turns their head slightly, one eye may become soft because the depth of field is extremely shallow.
When photographing couples or groups, slightly stopping down to f/4 or f/5.6 provides extra sharpness without sacrificing too much background separation.
Practical Tips for Using Wide Apertures
To make the most of wide apertures:
- Focus precisely on the eye closest to the camera.
- Increase the distance between your subject and the background to enhance bokeh.
- Avoid recomposing too much after focusing, especially at f/1.4 or wider.
- Use Eye Autofocus if your camera supports it.
- Review images periodically by zooming in to confirm critical sharpness.
Common Aperture Mistakes
Many beginners believe shooting every portrait at f/1.2 automatically produces better results. In reality, ultra-wide apertures are not always the best choice.
Common mistakes include:
- Using f/1.2 for group portraits.
- Missing focus because the depth of field is too shallow.
- Blurring important facial features unintentionally.
- Forgetting that longer focal lengths naturally increase background compression.
Professional photographers often choose f/2 to f/2.8 because these apertures offer an excellent balance between subject sharpness, pleasing background blur, and consistent focus accuracy.
2. Shutter Speed — Freeze the Moment
Shutter speed determines how long your camera’s sensor is exposed to light. Although portraits usually involve less movement than sports or wildlife photography, selecting the correct shutter speed remains essential for producing crisp, professional-looking images.
Even the slightest movement—a blink, a laugh, hair blowing in the wind, or the natural sway of your hands while holding the camera—can introduce unwanted blur if your shutter speed is too slow. A fast enough shutter speed ensures your subject’s eyes remain sharp, facial details stay crisp, and every portrait looks polished.
How Shutter Speed Affects Portraits
Shutter speed influences:
- Subject sharpness
- Camera shake
- Motion blur
- Exposure
- Flash synchronization
- Handheld shooting stability
A faster shutter speed freezes movement but allows less light to reach the sensor. A slower shutter speed increases brightness but raises the risk of blur.
Recommended Shutter Speeds:
Portrait Situation | Recommended Shutter Speed |
|---|---|
Studio portraits with flash | 1/160–1/200 sec |
Professional headshots | 1/125–1/200 sec |
Outdoor portraits | 1/250–1/500 sec |
Children | 1/320–1/640 sec |
Walking portraits | 1/500 sec or faster |
Windy conditions | 1/500 sec or faster |
Follow the Focal Length Rule
When shooting handheld, use the classic guideline.
Minimum shutter speed = 1 ÷ focal length
Examples:
Lens | Minimum Recommended Speed |
|---|---|
50mm | 1/60 sec |
85mm | 1/100 sec |
105mm | 1/125 sec |
135mm | 1/160 sec |
200mm | 1/250 sec |
If your camera lacks image stabilization or you’re photographing a moving subject, choose an even faster shutter speed for added security.
Using Flash
When working with external flashes or studio strobes, remember that most cameras have a maximum flash sync speed between 1/160 and 1/250 second. Exceeding this limit without High-Speed Sync (HSS) may result in partially dark frames because the shutter curtains block part of the sensor during the flash exposure.
Tips for Consistently Sharp Portraits
- Increase shutter speed when your subject is moving.
- Use burst mode during candid moments to improve your chances of capturing the perfect expression.
- Stabilize your camera with proper handholding technique or a tripod when light levels are low.
- Combine an appropriate shutter speed with a suitable aperture and ISO rather than relying on only one setting to solve exposure issues.
A well-chosen shutter speed works hand in hand with aperture and ISO, ensuring every portrait is not only beautifully exposed but also tack-sharp where it matters most—the subject’s eyes.
3. ISO — Keep It as Low as Possible
ISO is the third pillar of the exposure triangle and controls how sensitive your camera’s image sensor is to light. While increasing ISO allows you to shoot in darker environments without slowing your shutter speed or opening your aperture further, it also introduces digital noise that can reduce image quality.
For portrait photography, preserving fine details and natural-looking skin tones is usually the priority. That’s why professional photographers typically keep ISO as low as lighting conditions allow. A lower ISO produces cleaner images with smoother tonal transitions, richer colors, and greater dynamic range—making post-processing much easier.
Unlike aperture and shutter speed, ISO doesn’t physically change the amount of light entering the camera. Instead, it amplifies the sensor’s signal, which brightens the image but also makes any existing noise more noticeable.
Why ISO Matters for Portrait Photography?
Choosing the correct ISO helps you balance image quality and proper exposure. An unnecessarily high ISO may create grainy skin, reduce sharpness, and limit your ability to recover shadows during editing. On the other hand, keeping ISO too low in dim lighting may force you to use a shutter speed that’s too slow, resulting in blurry portraits.
A good portrait photographer always aims for the lowest ISO that still allows the desired shutter speed and aperture.
Recommended ISO Settings:
Shooting Condition | Recommended ISO | Expected Image Quality |
|---|---|---|
Bright sunlight | ISO 100 | Maximum quality |
Sunny outdoor portraits | ISO 100–200 | Excellent |
Cloudy weather | ISO 200–400 | Excellent |
Open shade | ISO 400–800 | Very good |
Indoor window light | ISO 800–1600 | Good |
Indoor without flash | ISO 1600–3200 | Moderate noise |
Evening portraits | ISO 3200–6400 | Visible noise |
Studio with strobes | ISO 100 | Outstanding |
Understanding ISO Performance
Modern cameras handle high ISO much better than older models, but image quality still varies depending on your camera’s sensor size.
Generally:
- Full-frame cameras produce cleaner images at high ISO.
- APS-C cameras perform very well up to moderate ISO values.
- Micro Four Thirds cameras may show noise earlier in low-light conditions.
Regardless of camera type, exposing your image correctly is more important than simply avoiding high ISO. A properly exposed photo at ISO 1600 often looks cleaner than an underexposed ISO 400 image that has been heavily brightened during editing.
Auto ISO vs Manual ISO
Many photographers hesitate to use Auto ISO, but it can be incredibly useful—especially during fast-moving portrait sessions.
Manual ISO
Best when:
- Working in a studio
- Lighting remains constant
- Shooting with flash
- Creating a consistent exposure across an entire session
Auto ISO
Best when:
- Photographing outdoor portraits with changing light
- Moving between sun and shade
- Capturing events or candid portraits
- Working quickly without constantly adjusting settings
Many professional photographers combine Manual Mode with Auto ISO, allowing them to lock in their preferred aperture and shutter speed while the camera automatically adjusts ISO as lighting changes.
Tips for Keeping ISO Low
Follow these practical strategies to minimize image noise:
- Use the widest practical aperture.
- Increase available light whenever possible.
- Position your subject near windows indoors.
- Use reflectors to brighten shadows naturally.
- Add off-camera flash or continuous lighting when needed.
- Stabilize your camera with a tripod if photographing stationary subjects.
Common ISO Mistakes
Avoid these common errors:
- Increasing ISO before adjusting aperture or lighting.
- Using ISO 6400 in bright daylight accidentally.
- Underexposing images and brightening them later.
- Assuming every image with visible grain is unusable.
A small amount of noise is far less noticeable than motion blur or missed focus. Prioritize sharp, well-exposed portraits over chasing the lowest possible ISO.
4. White Balance — Get Accurate Skin Tones
Beautiful portraits rely heavily on natural-looking skin tones, and that’s exactly what white balance controls. Even if your exposure is perfect, incorrect white balance can make skin appear unnaturally blue, orange, green, or yellow, reducing the professional quality of your images.
White balance adjusts the camera’s interpretation of color temperature so that whites appear neutral and skin tones remain realistic under different lighting conditions.
Because portrait photography focuses on people, achieving accurate color is just as important as achieving sharp focus.
Understanding Color Temperature
Different light sources produce different color temperatures, measured in Kelvin (K). Lower Kelvin values create warmer light, while higher values produce cooler light.
Light Source | Approximate Kelvin |
|---|---|
Candlelight | 1800–2200K |
Tungsten bulbs | 2800–3200K |
Sunrise / Sunset | 3000–4500K |
Flash | 5500K |
Midday Sun | 5500–5600K |
Cloudy | 6000–6500K |
Open Shade | 7000–8000K |
Understanding these values helps you match your camera settings to the available light more accurately.
Recommended White Balance Settings
Lighting Condition | Recommended Setting |
|---|---|
Bright daylight | Daylight (5500K) |
Studio strobes | Flash (5500K) |
Cloudy weather | Cloudy (6000–6500K) |
Open shade | Shade (7000–7500K) |
Incandescent bulbs | Tungsten (3200K) |
Mixed lighting | Custom Kelvin |
Professional color accuracy | Grey Card + Custom WB |
Auto White Balance (AWB)
Modern cameras have excellent Auto White Balance systems that perform well in many situations.
AWB works particularly well:
- Outdoors in consistent daylight
- During casual portrait sessions
- When shooting RAW
- In environments with a single dominant light source
However, AWB may struggle when:
- Multiple light sources have different color temperatures.
- Indoor lighting mixes daylight with warm bulbs.
- Colorful walls reflect unwanted color onto your subject.
- Stage or event lighting changes rapidly.
Why Professionals Prefer Manual White Balance?
Professional portrait photographers often set white balance manually rather than relying entirely on Auto White Balance.
Benefits include:
- Consistent skin tones across hundreds of images.
- Less editing time.
- More accurate color reproduction.
- Easier batch processing in Lightroom or Capture One.
If you’re photographing an entire portrait session under the same lighting, manually setting Kelvin often produces more consistent results than allowing Auto White Balance to recalculate every frame.
Shoot in RAW for Maximum Flexibility
One of the biggest advantages of shooting RAW is the ability to adjust white balance later without degrading image quality.
This means you can:
- Correct overly warm or cool images.
- Match color across multiple cameras.
- Fine-tune skin tones precisely.
- Recover from difficult lighting situations.
Although RAW provides this flexibility, it’s still good practice to capture the most accurate white balance possible in-camera. Doing so speeds up your editing workflow and ensures your previews look accurate during the session.
Helpful Tools for Accurate White Balance
Professional photographers often use simple accessories to improve color consistency:
Tool | Purpose |
|---|---|
Grey Card | Creates accurate custom white balance |
Color Checker Passport | Produces highly accurate color profiles |
Light Meter | Measures light intensity |
White Reflector | Adds neutral fill light without color casts |
Common White Balance Mistakes
Avoid these frequent issues:
- Leaving Auto White Balance enabled throughout mixed-light sessions.
- Ignoring strong color reflections from nearby walls or clothing.
- Forgetting to reset white balance after moving between indoor and outdoor locations.
- Trusting only the LCD screen instead of checking the histogram and RAW files.
Correct white balance not only improves skin tones but also enhances the overall mood of a portrait. Warm tones can create a welcoming, emotional atmosphere, while cooler tones may convey elegance or drama. Learning to control white balance intentionally gives you another creative tool for producing portraits that look polished, natural, and visually compelling.
Recommended Lens Choices for Portraits
While camera settings play a vital role in portrait photography, the lens you choose has an equally significant impact on the final image. Different focal lengths affect perspective, background compression, facial proportions, and the amount of the environment included in the frame.
A good portrait lens doesn’t just make your subject appear sharper—it also helps create flattering facial features and pleasing background separation.
Generally, portrait photographers prefer lenses between 50mm and 135mm, as these focal lengths minimize distortion and produce natural-looking proportions.
Popular Portrait Lens Options
50mm Lens — A Versatile Everyday Choice
The 50mm lens offers a perspective similar to human vision, making it ideal for lifestyle portraits, environmental portraits, and full-body compositions.
Best for:
- Beginner photographers
- Indoor portraits
- Street portraits
- Lifestyle sessions
- Environmental storytelling
Advantages:
- Affordable
- Lightweight
- Excellent image quality
- Natural perspective
- Wide aperture options available
85mm Lens — The Classic Portrait Lens
The 85mm focal length has long been considered the gold standard for portrait photography. It provides flattering facial compression while maintaining a comfortable working distance between the photographer and subject.
Best for:
- Professional headshots
- Half-body portraits
- Engagement sessions
- Fashion photography
- Studio portraits
Advantages:
- Beautiful background blur
- Excellent facial proportions
- Minimal distortion
- Strong subject isolation
105mm and 135mm Lenses — Premium Headshot Specialists
Longer portrait lenses create even greater background compression, making them popular among professional headshot photographers. These lenses are especially useful when photographing executives, actors, or business professionals who want polished, flattering portraits.
Advantages
- Outstanding subject separation
- Smooth background rendering
- Highly flattering facial features
- Excellent edge-to-edge sharpness
70–200mm f/2.8 — Maximum Flexibility
The 70–200mm zoom is one of the most versatile lenses available for portrait photographers. It allows you to change compositions quickly without moving your position, making it perfect for weddings, events, and outdoor portrait sessions.
Best for:
- Weddings
- Corporate events
- Family portraits
- Outdoor sessions
- Sports portraits
- Candid photography
Its flexibility allows photographers to capture both wide environmental portraits and tight headshots using a single lens.
Portrait Lens Comparison
Lens | Best For | Background Blur | Working Distance |
|---|---|---|---|
35mm | Environmental portraits | Moderate | Close |
50mm | Lifestyle portraits | Strong | Moderate |
85mm | Professional headshots | Excellent | Comfortable |
105mm | Tight portraits | Outstanding | Longer |
135mm | Studio headshots | Exceptional | Long |
70–200mm f/2.8 | Versatile sessions | Excellent | Variable |
Prime vs Zoom Lenses
Prime Lens | Zoom Lens |
|---|---|
Wider maximum apertures | Greater flexibility |
Typically sharper | Faster framing adjustments |
Smaller and lighter | Covers multiple focal lengths |
Often more affordable | Ideal for events and fast-paced sessions |
Both options are excellent for portrait photography. Prime lenses excel in image quality and low-light performance, while zoom lenses provide unmatched convenience and versatility.
Quick-Reference: Recommended Portrait Settings
Whether you’re photographing clients in a professional studio or capturing candid moments outdoors, having a reliable starting point for your camera settings can save valuable time. While every portrait session is unique, these recommended settings provide an excellent baseline that you can adjust based on lighting, subject movement, and your creative vision.
Think of this section as a practical cheat sheet rather than a strict rulebook. Professional photographers constantly fine-tune their settings throughout a session as lighting conditions change, but beginning with proven combinations makes achieving consistent results much easier.
Portrait Camera Settings Cheat Sheet
Portrait Scenario | Aperture | Shutter Speed | ISO | White Balance | Focus Mode |
|---|---|---|---|---|---|
Studio headshot (Strobes) | f/8 | 1/160 sec | ISO 100 | Flash (5500K) | Single-Point AF |
Outdoor Golden Hour | f/2 | 1/500 sec | ISO 100 | Cloudy (6000K) | Eye AF |
Indoor Window Light | f/2.8 | 1/125 sec | ISO 800 | Daylight (5500K) | Eye AF |
Family Portrait | f/5.6 | 1/250 sec | ISO 200 | Daylight | Single-Point AF |
Couple Portrait | f/2.8 | 1/250 sec | ISO 100–200 | Cloudy | Eye AF |
Corporate Headshot | f/5.6–f/8 | 1/160 sec | ISO 100 | Flash | Single AF |
Low-Light Event | f/1.8 | 1/125 sec | ISO 3200 | Auto or Tungsten | Continuous AF |
Children Playing | f/2.8 | 1/640 sec | ISO 200–800 | Auto | Continuous AF |
Outdoor Fashion Portrait | f/2 | 1/1000 sec | ISO 100 | Daylight | Eye AF |
Environmental Portrait | f/4 | 1/250 sec | ISO 100–400 | Daylight | Eye AF |
Camera Settings by Lighting Condition
Lighting changes throughout the day, so understanding how to adapt your settings is an essential portrait photography skill.
Lighting Condition | Aperture | Shutter Speed | ISO |
|---|---|---|---|
Bright Midday Sun | f/2.8–f/4 | 1/1000 sec | ISO 100 |
Golden Hour | f/1.8–f/2.8 | 1/500 sec | ISO 100 |
Cloudy Afternoon | f/2–f/4 | 1/250 sec | ISO 200–400 |
Indoor Natural Light | f/2–f/2.8 | 1/125 sec | ISO 800 |
Studio Flash | f/8 | 1/160 sec | ISO 100 |
Evening Portraits | f/1.8 | 1/125 sec | ISO 1600–3200 |
Recommended Autofocus Settings
Sharp eyes are one of the defining characteristics of a professional portrait. Your autofocus settings are just as important as your exposure settings.
Portrait Type | Recommended Focus Mode |
|---|---|
Individual Headshot | Eye Detection AF |
Couple Portrait | Eye Detection AF |
Family Portrait | Single-Point AF |
Children | Continuous AF (AF-C / AI Servo) |
Walking Portraits | Continuous AF |
Studio Portrait | Single AF (AF-S / One Shot) |
Recommended Drive Modes
Choosing the correct drive mode improves your chances of capturing the perfect expression.
Situation | Drive Mode |
|---|---|
Studio Portrait | Single Shot |
Professional Headshots | Single Shot |
Children | Continuous Low |
Fashion Session | Continuous High |
Candid Portraits | Continuous Low |
Events | Continuous High |
Exposure Triangle Quick Guide
When one setting changes, another usually needs adjustment to maintain proper exposure.
If You Change… | You May Need To… |
|---|---|
Wider Aperture | Increase shutter speed or lower ISO |
Narrower Aperture | Slow shutter speed or increase ISO |
Faster Shutter Speed | Raise ISO or widen aperture |
Slower Shutter Speed | Lower ISO or narrow aperture |
Higher ISO | Increase shutter speed if possible |
Lower ISO | Add more light or widen the aperture |
These reference tables provide an excellent starting point, but don’t hesitate to experiment. Every portrait session is different, and learning how to adapt these settings will help you become a more confident photographer.
Extra Tips for Sharper, More Flattering Portraits
Camera settings are only one part of creating exceptional portraits. Attention to focus, composition, lighting, posing, and communication with your subject can elevate an ordinary image into a memorable portrait.
The following professional tips will help you consistently capture sharper, more flattering photographs regardless of your experience level.
Always Focus on the Eyes
The eyes naturally draw a viewer’s attention first. Even if the rest of the portrait is technically perfect, soft or blurry eyes can make the entire image feel out of focus.
When photographing a single subject:
- Focus on the eye closest to the camera.
- Use Eye Detection AF whenever possible.
- Zoom into your images during the session to verify sharpness.
For group portraits, focus on a person positioned approximately one-third into the depth of the group while using a smaller aperture to keep everyone sharp.
Use Single-Point AF or Eye Detection AF
Allowing your camera to automatically select focus points often leads to inconsistent results. Instead, manually choose your focus point or enable Eye Detection Autofocus if your camera supports it.
Modern mirrorless cameras can recognize and track a subject’s eyes with remarkable accuracy, making them ideal for portrait photography.
Shoot in RAW Format
RAW files retain significantly more image data than JPEG files, providing greater flexibility during editing.
Benefits of shooting RAW include:
- Better highlight recovery
- Improved shadow detail
- Accurate white balance adjustments
- Greater color depth
- Reduced image degradation during editing
Although RAW files require more storage space, they offer substantial advantages for professional portrait work.
Use Reflectors to Control Light
A simple reflector is one of the most affordable tools for improving portrait lighting.
Different reflector surfaces produce different effects:
Reflector Color | Effect |
|---|---|
White | Soft, natural fill light |
Silver | Bright, high-contrast fill |
Gold | Warm skin tones |
Soft Gold | Subtle warmth |
Black | Adds contrast by absorbing light |
Translucent | Softens harsh sunlight |
Reflectors can reduce shadows under the eyes, brighten facial features, and create more balanced lighting without requiring additional flashes.
Shoot at Eye Level
Camera angle influences facial proportions more than many beginners realize.
Generally:
- Eye-level angles create natural-looking portraits.
- Slightly higher angles can be flattering for headshots.
- Lower angles may exaggerate the jawline and nostrils unless used intentionally.
Always consider the story and mood you want the portrait to convey before changing your shooting angle.
Pay Attention to Backgrounds
A cluttered background can distract viewers from your subject.
Before pressing the shutter:
- Remove distracting objects.
- Position your subject away from busy backgrounds.
- Use longer focal lengths for stronger background compression.
- Choose backgrounds with complementary colors.
Remember that even a beautifully blurred background should support—not compete with—your subject.
Communicate with Your Subject
Portrait photography is about people as much as it is about cameras.
Keep your subject relaxed by:
- Giving clear posing directions.
- Offering positive feedback.
- Maintaining conversation.
- Showing a few successful images during the session.
Relaxed subjects naturally produce more authentic expressions.
Watch Your Light Direction
The direction of light affects mood, depth, and facial features.
Lighting Direction | Best Use |
|---|---|
Front Light | Even skin tones |
Side Light | Dramatic portraits |
45-Degree Light | Professional headshots |
Backlight | Dreamy outdoor portraits |
Butterfly Lighting | Beauty photography |
Rembrandt Lighting | Artistic portraits |
Understanding light placement allows you to shape facial features and create different moods without changing your camera settings.
Common Mistakes Photographers Make
Even experienced photographers occasionally make technical mistakes. Recognizing these issues helps you avoid them before they affect your images.
Mistake | Better Approach |
|---|---|
Using Auto Mode for every session | Learn Manual or Aperture Priority |
Focusing on the nose instead of the eyes | Always prioritize eye focus |
Shooting every portrait at f/1.2 | Choose an aperture based on the scene |
Using unnecessarily high ISO | Keep ISO as low as practical |
Ignoring white balance | Match WB to the light source |
Overediting skin | Preserve natural texture |
Forgetting background distractions | Scan the frame before shooting |
Standing too close with a wide lens | Use flattering focal lengths |
Relying solely on the LCD | Check the histogram regularly |
Taking only one frame | Capture multiple expressions and poses |
Photography Terms Explained
Understanding photography terminology is just as important as mastering your camera settings. These foundational concepts will help you make informed decisions while shooting and editing portraits. Whether you’re reading camera manuals, following photography tutorials, or discussing techniques with other photographers, knowing these terms will improve both your confidence and your results.
Bokeh
Bokeh refers to the aesthetic quality of the out-of-focus areas in an image, especially the background. It is one of the defining characteristics of professional portrait photography because it helps isolate the subject and creates a pleasing sense of depth.
Several factors influence the appearance of bokeh, including:
- Lens aperture
- Lens design and diaphragm blades
- Focal length
- Distance between the subject and the background
- Distance between the camera and the subject
For example, an 85mm f/1.8 lens positioned several feet from the subject can create a beautifully smooth, creamy background blur that draws attention directly to the face.
Tip: Background blur becomes even stronger when your subject is positioned farther away from the background.
Depth of Field (DoF)
Depth of Field (DoF) describes how much of the image appears acceptably sharp from front to back.
Portrait photographers often use a shallow depth of field to separate the subject from distracting backgrounds. Conversely, a deep depth of field keeps more of the scene in focus, making it suitable for family portraits, environmental portraits, or large groups.
Factors Affecting Depth of Field:
Factor | Shallower DoF | Deeper DoF |
|---|---|---|
Aperture | f/1.2–f/2.8 | f/8–f/16 |
Focal Length | Longer lenses | Wider lenses |
Subject Distance | Closer | Farther |
Sensor Size | Full Frame | Smaller Sensors |
Understanding depth of field helps you choose the right aperture for every portrait scenario instead of relying on guesswork.
Exposure Triangle
The Exposure Triangle is the relationship between the three primary exposure settings:
- Aperture
- Shutter Speed
- ISO
Each setting influences both the brightness and creative appearance of your image.
For example:
- Opening the aperture lets in more light but reduces the depth of field.
- Increasing shutter speed freezes movement but darkens the image.
- Raising ISO brightens the image while increasing digital noise.
Successful portrait photographers constantly balance these three settings to achieve proper exposure without sacrificing image quality.
Exposure Triangle Summary
Setting | Controls | Creative Effect |
|---|---|---|
Aperture | Light entering the lens | Background blur |
Shutter Speed | Exposure duration | Motion blur or sharpness |
ISO | Sensor sensitivity | Brightness and image noise |
RAW Format
A RAW file is an unprocessed image that contains all the data captured by your camera’s sensor. Unlike JPEG files, RAW images preserve maximum detail, making them ideal for professional editing.
Advantages of shooting RAW include:
- Better highlight recovery
- Greater shadow detail
- Flexible white balance adjustments
- Higher color accuracy
- Improved dynamic range
- Less quality loss during editing
Although RAW files require more storage space, they provide significantly more editing flexibility and are strongly recommended for portrait photography.
Dynamic Range
Dynamic Range is the amount of detail your camera can capture in both the brightest highlights and darkest shadows within the same image. Portrait photographers often work in challenging lighting conditions where preserving facial detail is essential. Cameras with good dynamic range make it easier to recover details during post-processing without introducing excessive noise.
A high dynamic range is especially useful when photographing:
- Outdoor portraits at midday
- Backlit subjects
- Sunset sessions
- High-contrast scenes
Focal Length
Focal length, measured in millimeters (mm), determines your lens’s angle of view and perspective.
Different focal lengths produce different portrait styles.
Focal Length | Common Use |
|---|---|
35mm | Environmental portraits |
50mm | Lifestyle portraits |
85mm | Classic headshots |
105mm | Professional portraits |
135mm | Tight headshots |
70–200mm | Weddings and events |
Longer focal lengths generally create more flattering facial proportions because they compress perspective.
Eye Autofocus (Eye AF)
Eye Autofocus is an advanced focusing technology that automatically detects and tracks a subject’s eye.
Modern mirrorless cameras use Eye AF to maintain critical focus even while subjects move, making it one of the most valuable features for portrait photography.
Benefits include:
- Faster focusing
- Improved accuracy
- Higher keeper rate
- Better performance with wide apertures
Histogram
A histogram is a graphical representation of the brightness levels within your image.
Rather than relying solely on your camera’s LCD screen, checking the histogram allows you to verify exposure more accurately.
A balanced histogram typically indicates:
- No clipped highlights
- Good shadow detail
- Proper overall exposure
Learning to read the histogram is an excellent habit for photographers who want consistent results in varying lighting conditions.
Ready to Level Up Your Portrait Photography?
Mastering the Best Camera Settings for Portrait Photography is one of the most valuable investments you can make as a photographer. While purchasing new gear can certainly enhance your capabilities, understanding how to use your existing equipment effectively will have a much greater impact on the quality of your portraits.
Throughout this guide, you’ve learned how aperture, shutter speed, ISO, and white balance work together to create sharp, well-exposed, and visually appealing images. You’ve also explored recommended portrait lenses, autofocus techniques, lighting considerations, practical shooting tips, and common mistakes to avoid.
Remember that there is no single “perfect” camera setting for every portrait. Every location, subject, and lighting condition presents a unique challenge. The goal is to understand the purpose of each setting so you can confidently adapt to changing situations while maintaining complete creative control.
Check out our other guides for more portrait photography tips:
- What to Consider in a Professional Headshots Session
- What to Wear for Professional Headshots
- Headshot Poses: Do’s and Don’ts
Frequently Asked Questions: Best Camera Settings for Portrait Photography
Q. What are the best camera settings for portrait photography?
- A good starting point is an aperture between f/2 and f/2.8, a shutter speed of 1/125 to 1/250 second, the lowest practical ISO (typically ISO 100–400), and a white balance that matches your lighting conditions. Adjust these settings based on your environment and creative goals.
Q. Which aperture is best for portrait photography?
- For single-subject portraits, f/2 to f/2.8 provides an excellent balance between sharp facial features and a beautifully blurred background. Group portraits generally require narrower apertures such as f/5.6 or f/8 to keep everyone in focus.
Q. What ISO should I use for portraits?
- Whenever possible, keep ISO as low as lighting allows. Use ISO 100–200 in bright conditions, ISO 400–800 in overcast light, and ISO 800–1600 indoors if additional lighting isn’t available.
Q. What shutter speed is recommended for portraits?
- For stationary subjects, 1/125 second is often sufficient. For active children, walking portraits, or windy conditions, use 1/250 second or faster to eliminate motion blur.
Q.Should I shoot portraits in RAW or JPEG?
- RAW is highly recommended because it preserves more image data, allowing greater flexibility when adjusting exposure, white balance, colors, and shadows during editing.
Q. What focal length is best for portrait photography?
- Portrait photographers commonly use 50mm, 85mm, 105mm, and 135mm lenses. Among these, 85mm is widely considered the classic focal length for flattering headshots.
Q. Is Eye Autofocus useful for portraits?
- Yes. Eye Autofocus helps maintain precise focus on the subject’s eyes, even if they move slightly. It significantly improves focusing accuracy, particularly when shooting with wide apertures.
Q. Should I use Auto ISO for portrait photography?
- Auto ISO can be an excellent option when lighting changes frequently, such as during outdoor sessions. In controlled environments like studios, manually selecting ISO usually provides more consistent results.
Q. What white balance should I use for portraits?
- Match the white balance to your light source. For example, use Daylight (5500K) outdoors, Cloudy (6000–6500K) under overcast skies, and Flash (5500K) when working with studio strobes.
Q. Why are my portraits blurry?
- Blur can result from slow shutter speeds, incorrect focus, subject movement, or camera shake. Increasing your shutter speed and focusing on the subject’s eyes can significantly improve sharpness.
Q. Is Manual Mode better than Auto Mode?
- Yes. Manual Mode gives you complete control over exposure and creative settings, allowing you to produce more consistent and professional-looking portraits in a wide range of lighting conditions.
Q. Can I take professional portraits with a beginner camera?
- Absolutely. A beginner camera paired with the right lens and proper camera settings can produce outstanding portraits. Technical knowledge and good lighting are often more important than expensive equipment.
Q. What is the best focus mode for portraits?
- For single subjects, Single-Point AF or Eye Detection AF works best. For moving subjects, use Continuous AF (AF-C/AI Servo) to maintain focus as they move.
Q. How can I achieve a blurred background in portraits?
- Use a wide aperture, position your subject farther from the background, move closer to the subject, and choose a longer focal length, such as 85mm or 135mm, for stronger background separation.
Q. How do professional photographers get sharp portraits every time?
- Professionals combine accurate focus, appropriate shutter speeds, controlled lighting, proper posing, and consistent camera settings. They also review images during the session and make adjustments as needed to ensure every portrait meets a high standard of quality.
Conclusion
Mastering the Best Camera Settings for Portrait Photography is about understanding how aperture, shutter speed, ISO, and white balance work together to create sharp, well-exposed, and flattering portraits. While every shooting situation is different, knowing how to adjust these settings confidently will help you adapt to changing light and capture consistently professional results.
Remember, great portraits aren’t created by expensive gear alone; they come from combining the right camera settings with good lighting, thoughtful composition, and a genuine connection with your subject. Keep practicing, experiment with different settings, and you’ll quickly develop the skills needed to create beautiful portraits in any environment.